Stencil-cover
Picture of By Barbara

By Barbara

Please read through our Rock Paint Copyright policy.

Rock Painting tutorial using a leaping hare stencil

The stencil is a guide that allows you to position a shape without having to draw it freehand. Stencils can be a bit tricky to use if you don’t know what to expect, I’ll show you how to use the stencil to get the best results. In this rock painting tutorial, we’ll use the Leaping Hare stencil from our selection of Bunny & Hare stencils.

Painting onto a rounded rock is a bit more difficult than painting onto a flat surface because the stencil is a bit stiff and doesn’t bend around curves very well.

Step 1: Find a nice sized rock, check that the stencil shape fits well onto the surface of the rock.

Step 2: Using White Chalk Paint, paint a smooth layer all over the front and sides of the rock. Allow the paint to dry then paint the reverse side of the rock. Allow to dry and give the front and back a second coat of paint. Allow to dry.

Step 3: We’re going to create a hilly background for the Hare. When the white is completely dry on both sides, you can use an ordinary pencil to draw nice slow arcs for hills. Bigger in the front and shallower towards the middle of the rock, the horizon.

Step 4: Using Olive Green paint, start by painting the hills which are further back, closer to the horizon.

Step 5: Add a blob of Olive Green paint and Apple Green paint to your mixing dish, mix them together to paint a hill which is closer to the foreground. 

Step 6: Do the same again, adding some Pistachio Green to the mix to make the green even lighter so that you can paint a hill nearer the front. The last hill in the foreground can be pure Pistachio Green.


Step 7: When the hills are dry, and you’ve also painted some hills on the reverse of the rock, you can start with the sky.

Step 8: Mix a little Lily White and Periwinkle Blue together in a mixing dish. With the very light blue area, paint the middle, horizon area where the sky would meet the hills. As you get towards the top of the rock, add more blue and blend as you go along.

Step 9: Once the sky is dry on the front and the back of the rock, place your stencil and decide how the Hare should be positioned. He is a Leaping Hare so his hind legs should be higher than the front legs.


Step 10: Hold your stencil in place and flatten the stencil onto the rock one area at a time. Because of the curve of the rock, the stencil cannot wrap around the rock all at once, so you need to trace only one section at a time. If you are working on a flat surface (not a rock), this part will be a little easier.

Step 11: Use a normal pencil which has been sharpened, to trace around the outside edge of the Hare. First the front feet, then middle then back and back legs. Don’t trace any of the flowers yet.

Step 12: Now paint the Hare a flat black using Jet Black paint.


Step 13: You can give the Hare a second coat of black and allow it to dry.

Step 14: We’re going to do small steps at a time, using the stencil to guide us. Mix up a little Lily White paint with a drop of water in your mixing dish. The paint consistency should be liquidy (not thick) but not too watery and diluted, Using your finest brush, dip the brush into the white paint mix, position your stencil over the back legs area, making sure it’s straight, and mark out a thin line where the back feet divide. Remove the stencil – your white line might be wobbly but it’s just a guide at this stage,


Step 15: Using the guide line you’ve made, use Lily White paint straight from the pot (not diluted) to paint the line which divides the back feet. The paint should dry quite quickly, when it’s dry, place your stencil over the ears area

Step 16: The paint should dry quite quickly, when it’s dry, place your stencil over the ears area and using the diluted white paint and your fine brush, mark the line that divides the ears.

Step 19: Using Lily White paint straight from the pot (not diluted), paint the line that divides the ears.


Step 20: Do exactly the same with the line dividing the front legs, first using diluted white to simply mark the area as a guide, then using paint straight from the pot to properly paint the line.

Step 21: Use the same method to mark then paint the eye in place. It’s really helpful to have the stencil guide to show you where everything goes.

Step 22: Use the same method to mark and paint the hind leg line.


Step 23: Now you are ready to start with the flowers, only do one or two at a time, again marking the flowers with fine lines, with your diluted paint, then painting them properly with undiluted paint.


Step 24: Carry on with the flowers in the same way until the Hare is complete.

Step 25: You can use the Hare stencil to create little flowers on the green hills, using the same method as above. Your Leaping Hare is complete, well done!

Share this post

More Rockpaint Blogs

Chalk Paint
Blog

Chalk Paint

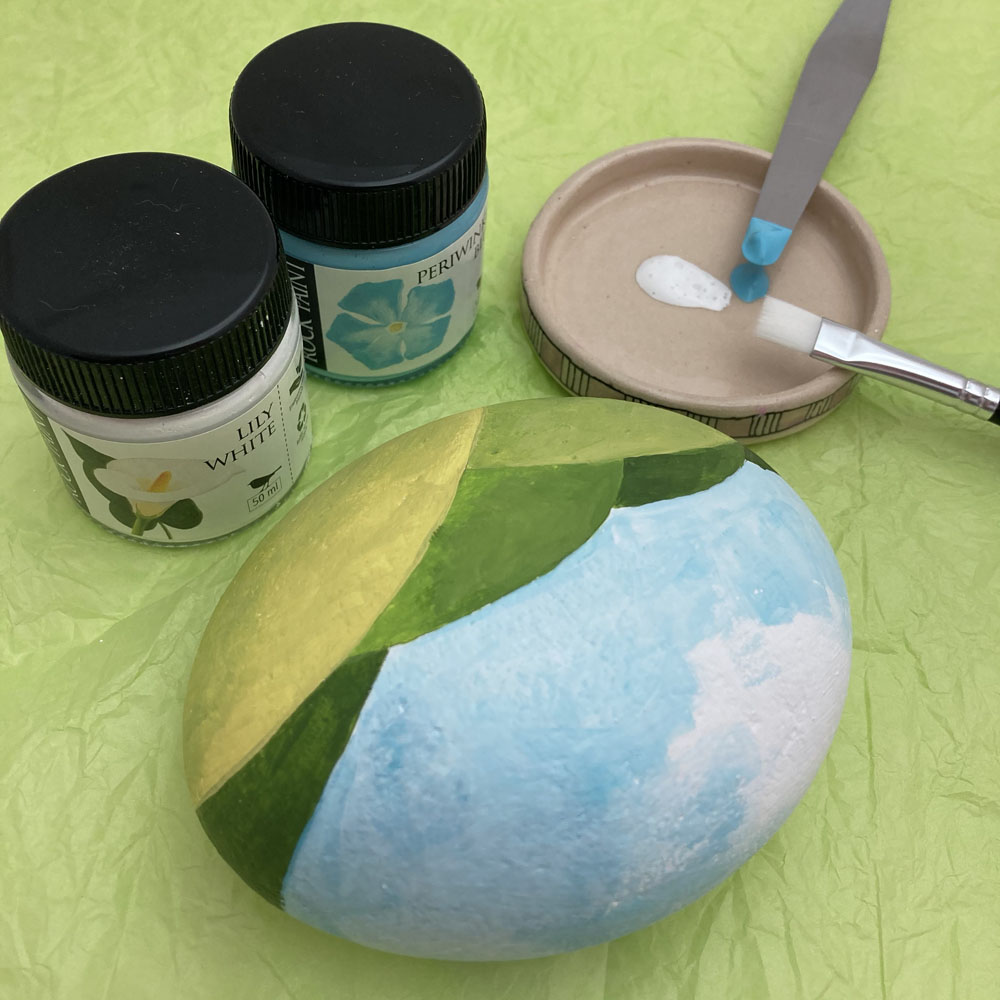
Chalk Paint is a wonderful, thick, chalky paint that gives amazing, opaque coverage. You can use it as a base coat before applying colour paint.

Read More »