

You’ll enjoy painting Shweshwe Santas for Christmas. You can give them as gifts, decorate your Christmas Dinner table with them or gift them randomly by leaving them in public spaces so unsuspecting strangers can come across them by surprise. You can download and print this instruction sheet or you can follow the step-by-step photo tutorial below. All you’ll need for this rock painting project is
• A Smooth, oval shaped pebble
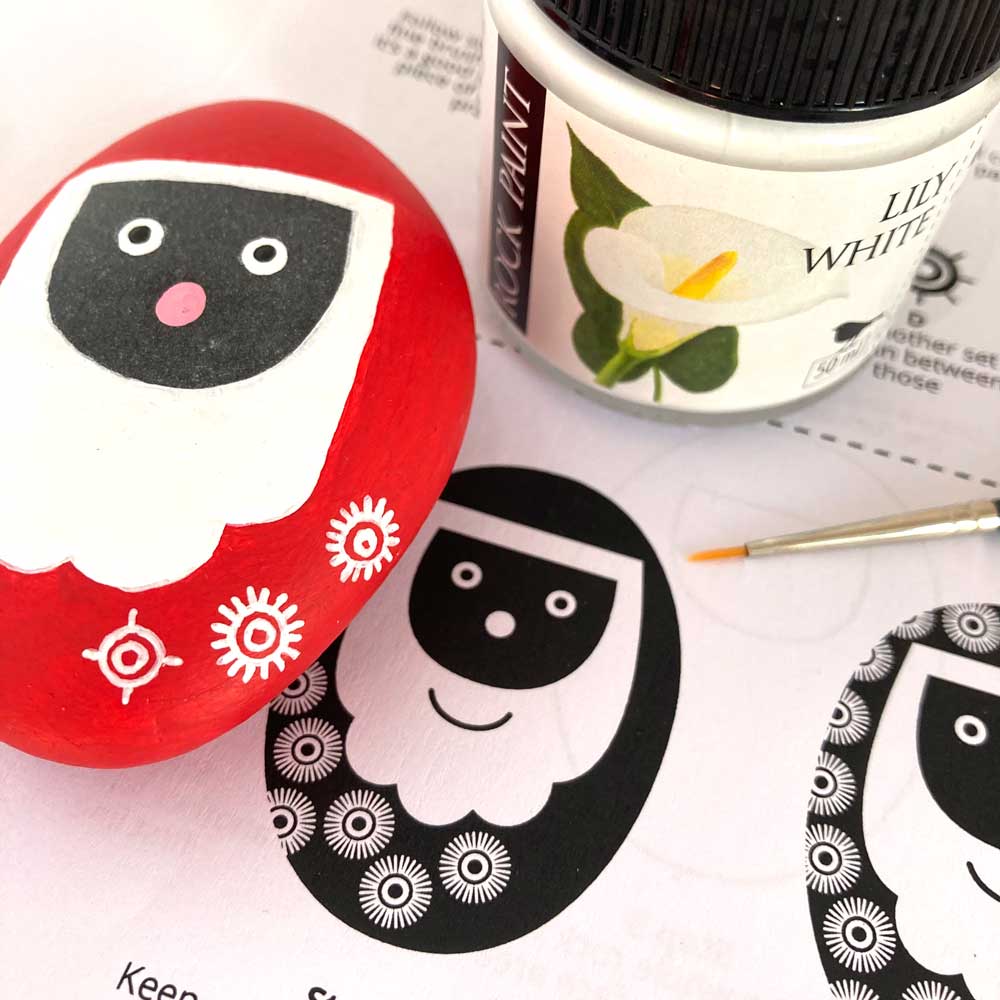
• Lily White paint
• Cherry Red paint
• Jet Black paint
• A white pencil or normal pencil
• Dotting Tools
• A small round 4/0, Round 1 paintbrush and a Flat 4 paintbrush.
Let’s begin.
Step 1: You’ll need a smooth, oval shaped pebble or rock for your Santa. Using a white pencil if you have one, or any normal pencil, draw a line across the top of the stone, then draw a half-circle under that to mark the face area. Follow the positioning on the instruction sheet or the photos below.
Step 2: Using Lily White, paint the pebble all around the outside of the face shape, keeping your edge very clean and neat. You can use your flat brush for this. The first layer of white will be patchy, specially if your stone is quite dark, but that’s okay.
Step 3: When you have painted the whole stone back and front, leaving the face shape open, allow to dry then paint a second coat of Lily White, a third coat and maybe a fourth coat to get a perfect finish.
Step 4: If you have a red pencil-crayon, use it to draw a straight line above the face shape, then a line down each side of the face as shown below. If you don’t have a red pencil, a normal pencil is also fine.
Step 5: Then draw three or four rounded scallop shapes for the beard area, follow the pictures below.
Step 6: Using Cherry Red, paint around the beard shape. Once dry, remember to also paint the back of the stone. Once all the red paint is dry, paint a second coat of red on both the front and the back of the stone.
Step 7: Draw two small circles for eyes using a white pencil.
Step 8: Use your dotting tool to dip into paint to create the eyes. If your dotting tool ball is smaller than the circle you marked, make your dot bigger by making a small circular motion with the dotting tool tool.
Step 9: Mix a dab of white and red together to create a pink for Santa’s nose. Use your dotting tool again to create this dot.
Step 9: Using Jet Black paint and the smaller end of your dotting tool, dot the centre of the eyes.
Step 10: Draw a gentle arc for a smile, in the white beard area, using a normal pencil.
Step 11:Using your finest 4/0 brush and Jet Black, carefully paint Santa’s smile.
It’s time to start with the Shweshwe patterns. It’s delicate work but not complicated. We’re first going to practice on a piece of scrap paper or card. You can use the inside of a cereal box or tea carton, a surface that isn’t white because we’ll be practicing with white paint. For more info on fine brushwork, have a look at my blog Painting Fine Detail with a Brush.
Step 12: Find a piece of card and using your finest brush, paint a tiny, open circle.
Step 13: Paint another fine line circle around the first circle.
Step 14: Paint short, fine lines at the North, South, East and West locations on the outside circle.
Step 15: Paint another 4 lines between the N, S, E, W lines.
Step 16: Paint lines between each of the lines already painted and if your lines were crazy-fine, you might fit yet another set of lines between those. But if not, that’s okay (I didn’t)
Step 17: Now it’s time to translate your new skill onto the Santa rock. Start by painting a tiny circle on the side of the Santa, near, but not too close to the beard.
Step 18: Paint the second circle and the first lot of N,S, E, W short lines on the outside of the outer circle.
Step 19: Paint the second lot of lines between those.
Step 20: Then the next lot of lines again, between those. Keep going, leaving some breathing room between each circle.
Step 21:
Carry on making your Shweshwe shapes until your Santa is filled, remembering to also paint them on the sides of the pebble, creeping into the back area, but you don’t need to fill the back area.
Step 22: The last step is to take your dotting tool again and using the finer ball, dot tiny white dots in between the Shweshwe shapes. Your lovely Santa is complete. Well done! You can varnish your Santa once all paint is dry and we recommend our Rock Paint Varnish.


