

Beautiful Barn Owls are one of the most fascinating and mystical creatures of the natural world. With their ghostly, heart-shaped faces, silent flight, and nocturnal habits, barn owls have long been associated with mystery and magic. Found in a variety of habitats, including farmlands and woodlands, they are exceptional hunters and their distinctive screeching call and pale plumage contribute to their mystical reputation in folklore, where they are often seen as symbols of wisdom or omens.
Despite their eerie appearance, barn owls play a vital role in maintaining ecological balance and they thrive in both rural and urban landscapes.
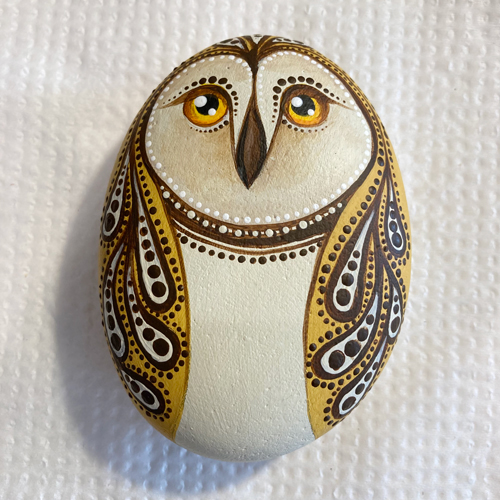
Join me in painting one of your own Mystical Barn Owls.
What you’ll need for this project:
- A flat, oval, smooth pebble, about the size of the palm of your hand
- Flat brush for painting background / undercoat (a Flat-8 brush will work well)
- A Round-1 brush for general detail
- Memory Brush or any very fine brush with a round front.
- White Chalk Paint
- River Stone paint
- Canary Yellow
- Naartjie Orange
- Gingerbread Brown
- Fudge Beige
- Jet Black
- Chocolate Brown
- Lily White
- Normal HB pencil
- An eraser
- A couple of toothpicks
- Circle Stencil (if you don’t have one, you can also make use of coins or other round objects)
- Dotting Tools
- The Barn Owl worksheet which can be downloaded at this link. You will need to print it so that you can practice painting the eyes.
You can purchase all these products along with a perfect stone for the Barn Owl project here.
Let’s begin. Follow the step-by-step rock painting instructions and pictures below.
Step 1: Using White Chalk paint and a flat wide brush (a Flat-8 brush will work well), give your rock a thin coating, keeping your brush-strokes even and smooth. Only paint one side of the rock (top side) and allow to dry, turn it over and paint the other side, making sure you also paint the edges (sides). When both sides are dry, decide if the rock needs a second coat of paint (this depends on the colour of the original rock – if it’s dark, you may need a second coat of Chalk paint on both sides).
Step 2: Once the Chalk Paint is completely dry, add a layer of River Stone paint to both sides of the rock, first one side, allow to dry, then the second side. Once dry, repeat so that the rock has 2 layers of River Stone paint on both sides.
Step 3: Estimate more-or-less where the centre top and the centre bottom of your rock is and make a gentle mark with your pencil, top and bottom.
Step 4: Join the two marks using the flat side of your Circle Stencil if you have one, otherwise the edge of a piece of paper or light weight card will work. This will be your vertical line down the centre of the rock.
Step 5: Use one of the larger circles on the circle stencil to draw an arc at the top of the rock – it should follow the shape of the rock and be around 5mm to 10mm away from the edge of your rock, depending on the rock size. You can also draw this by hand. Make sure your line is drawn lightly so that you can erase it if it’s not quite right the first time.
Step 6: The bottom curve of the face area can be drawn with the same stencil size again, creating an arc that is above the centre area of the rock (top to bottom). This means that the face area will end up being in the top third of the rock.
Step 7: Where the two arcs meet there will probably be a pointy area with your pencil marks, you can smooth that off with your pencil and erase the excess lines.
Step 8: You’ll end up with your owl’s face area, drawn gently in pencil. If you need to try again, simply erase the lines and start again.
Step 9: To position the eyes, draw a pencil line horizontally across the top third of the face area, you can use your circle stencil or a piece of this card as a ruler.
Step 10: Choose a circle size for the eyes and if you don’t have a circle stencil, you can use a coin.
Step 11: Draw the eyes lightly in pencil, using the horizontal line as a guide.
Step 12: Draw the bottom, pointy part of the beak, just above the chin area.
Step 13: Join the beak to the top of the eye.
Step 14: Erase the vertical and horizontal lines.
Step 15: Add a second circle inside the first circles, this will be the pupils of the eyes.
Step 16: Using a big circle on your stencil, draw the wing. It should touch the bottom-side edge of the face area. If you don’t have a circle stencil, you can use a cup or glass. Draw the second wing on the other side.
Step 17: Then mark the curves above the eyes using the circle stencil. If you don’t have a circle stencil, use a big coin or draw the arcs by hand, following the shape of the eye.
Step 18: Do the same on the other side.
Step 19: Erase the pencil marks at the top of the face area so you’re left with the typical Barn Owl heart-shape at the top of the face area.
Step 20: Download and print the Barn Owl worksheet, this is so that you can practice painting the eyes on paper before you paint them onto the rock.
Step 21: Using Canary Yellow, paint the full circle of the eye. Canary Yellow is quite translucent so you will be able to see your guide lines through the paint.
Step 22: Next, paint the thin outer circle in Naartjie Orange
Step 23: Once the paints are dry, use Jet Black to paint the inside circle.
Step 24: Allow to dry and paint another layer of black.
Step 25: Using a dotting tool, dot a bigger and a smaller dot for the reflection on the eye
Step 26: Put some River Stone and Gingerbread paint on your palette so that you can mix them to get a very light Gingerbread colour.
Step 27: Paint around the edge of the face area.
Step 28: While your paint is still wet, dip your brush into River Stone and blend the Gingerbread mix so that the edges of the face are a bit darker, and lighter towards the middle of the face.
Step 29: Add some more blending around the beak and under the eyes, using the same colours and method.
inStep 30: Using Gingerbread Brown, paint the beak, extending a thin line through the forehead.
Step 31: Using Fudge Beige, paint the wings and the head, leaving the face area and the chest area unpainted in Fudge Beige.
Step 32: Once the Fudge Beige is dry, you can give it a second layer, keeping your edges neat.
Step 33: When that is dry, paint the back of the owl using Fudge Beige as well.
Step 34: Using Canary Yellow, paint the eye with quite a thin layer so you can still see your pencil lines through it, as you did with the practice sheet in step 21.
Step 35: You can do the same with the second eye and allow them to dry completely.
Step 36: Then paint Naartjie Orange around the outer edge, leaving the centre part of the eye Yellow. (As in step 22).
Step 37: Do the same with the second eye then use your circle stencil to draw the inner pupil of the eye if you haven’t done so previously. You can also draw the circle by hand.
Step 38: Using Jet Black, paint the pupils, allow to dry and give them a second coat if needed.
Step 39: Using Chocolate Brown and a fine brush such as a Memory Brush, paint fine lines around the beak, reaching up to the edge of the eyes.
Step 40: Use the same brush and colour to paint around the beak shape and up the centre of the forehead.
Step 41: Paint heavy eyelids on top of both eyes, you can use the top of the round eye as a guide for the eyelid and allow the bottom of the eyelid to come close to the black pupil.
Step 42: Continue using Chocolate Brown and a fine brush such as a Memory Brush and paint fine lines around the face shape.
Step 43: Draw a band under the chin area.
Step 44: Paint the band under the chin with your fine brush and Chocolate Brown.
Step 45: Paint little brown lines in the gap between the chin and the band beneath it.
Step 46: Use your worksheet as a guide for the decorative shapes on the wings. They can be leaves or teardrop shapes (like this example). Mark them out in pencil first.
Step 47: Paint the teardrop or leaf shapes using Chocolate Brown.
Step 48: At the top, centre of the head, draw then paint three teardrop shapes.
Step 49: Paint the second wing to match the first wing, it doesn’t have to be exact but they should look similar and mirror each other.
Step 50: Here I have added another thin line under the chin area and also extended a line from the teardrops to the crown of the head on both sides. Each painted rock will be slightly different from the next and if yours doesn’t look identical to the sample in this workshop, that’s perfectly okay.
Step 51: Using River Stone paint and a dotting tool with quite a big round end, make a dot in the centre of the teardtop.
Step 52: Extend the dot with your fine paintbrush and some more River Stone paint, to follow the shape of the brown teardrop. Do the same on the second wing and the top crest.
Step 53: With the smaller end of your dotting tool, create a line of dots using Chocolate Brown, in the collar area.
Step 54: Using a dotting tool with a big end, dot Chocolate Brown dots into the teardrop shapes, bigger at the bottom, smaller as they travel up the teardrop shape.
Step 55: Do the same for the rest of the wing and also the second wing.
Step 56: Do the same in the crest area, you can add some more dots to the crest area, keep them symmetrical.
Step 57: Using a medium sized dotting tool, dot the eyebrows by starting with bigger dots and ‘walking the dot’ so that they get smaller towards the edges of the eyebrow.
Step 58: To make very fine dots, use a toothpick under the eye area, following the shape of the eye, start with the toothpick quite loaded with paint and walk the dots so that each dot gets slightly smaller towards the outer edge.
Step 59: Use Lily White paint and a dotting tool with a big end and place a big highlight on each eye (see Step 25).
Step 60: Add the second, smaller highlight to both the eyes.
Step 61: Starting at the beak, paint a line of dots, close to the edge, using a toothpick and Lily White paint.
Step 62: Continue the fine, neat line of white dots all around the face area, ending back at the other side of the beak.
Step 63: Use your finest dotting tool and your toothpick to create tiny neat rows of dots all around the teardrop shapes, do this on both the wings.
Step 64: Use a toothpick again and Lily White to dot more tiny rows around the rows of brown dots (around the teardrops). This helps to create a jewelled effect.
Step 65: Use the toothpick or your very fine dotting tool to add white dots inside the brown dots on the teardrop shapes.
Step 66: Add a line of white dots underneath both eyes, below the darker dots, following the round shape of the eyes.
Step 67: Add more white dots to the crown area.
Step 68: On the chest area, add little groups of 3 Chocolate Brown dots clustered together, over the whole front.
Step 69: Let the brown dots dry first, then add white dots using your medium sized dotting tool, inbetween the brown dots.
Note: Every rock and every owl is different and has its own character, if you’re running out of space for more dots and decoration, leave them out. If there are big gaps in some areas, add in some more dots.
You’re finished! Well done! Give your owl a name.
Products used in this tutorial
-

Naartjie Orange
R44.00 Add to cart -

Jet Black 50ml
R44.00 Add to cart -
Chocolate Brown
R44.00 Add to cart -
Canary Yellow
R44.00 Add to cart -

Lily White 50ml
R44.00 Add to cart -

Fudge Beige
R44.00 Add to cart -

River Stone
R44.00 Add to cart -

Double-Sided Dotting Tool Set of 5
R70.00 Add to cart -

White Chalk Paint 250ml
R228.00 Add to cart -

Gingerbread Brown
R44.00 Add to cart -
Memory Point – 2/0 brush
R152.00 Add to cart


