

Step-by-step photos and instructions on how to paint a Fairy House. (Hover over the pictures for instructions).
Fairy Houses Rocks
Find some house-shaped stones or pebbles.
Fairy Houses Step 1
Draw a horizontal line approximately halfway between the top and bottom for the stone, draw it all the way to the sides and across the back. This will demarcate the roof area.
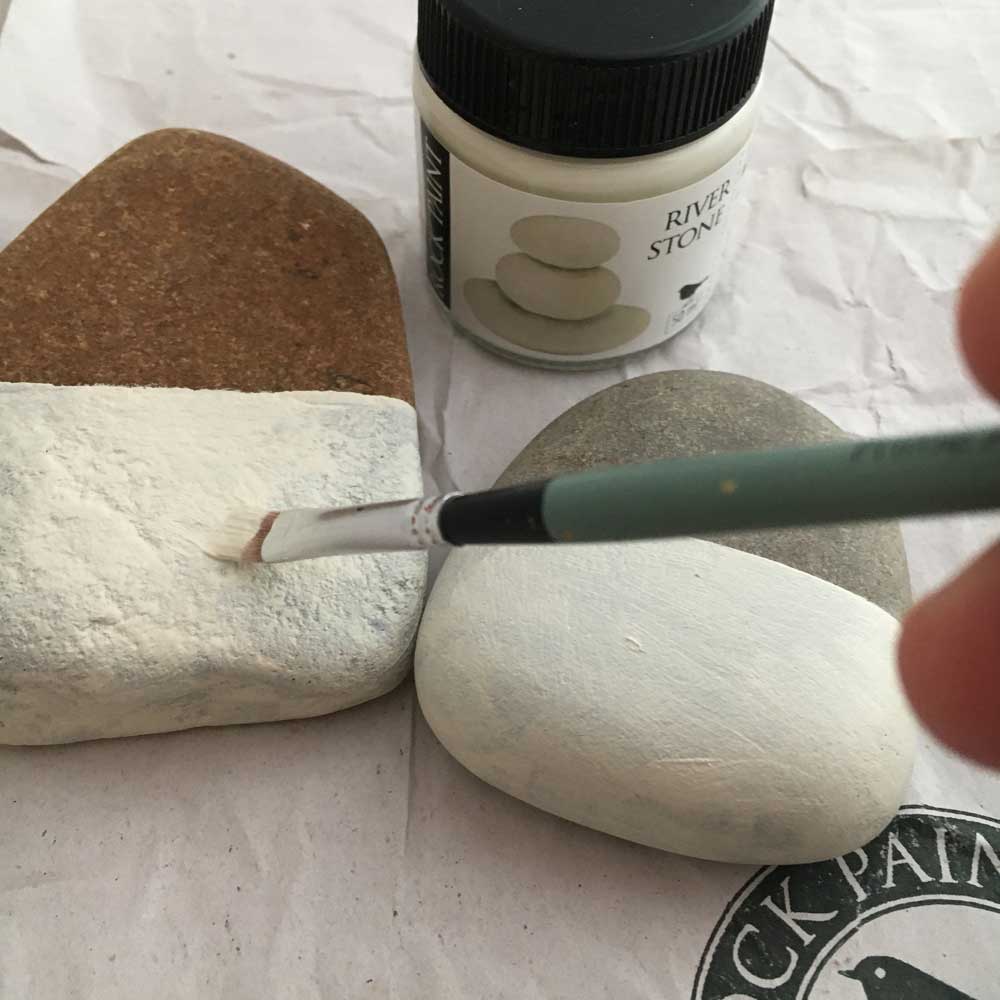
Fairy Houses Step 2
Paint the bottom half with a layer of River Stone coloured paint. Keep the line edge nice and neat.
Fairy Houses Step 3
Paint the sides as well, and once dry enough, paint the back too.
Fairy Houses Step 4
Decide now which will be the front and which the back of the house and paint a second layer of River Stone Colour over the middle front area. The rest of the stone does not need a second layer of paint.
Fairy Houses Step 5
Using Copper Kettle paint, the roof area front and sides, keeping the line area neat.
Fairy Houses Step 6
Once dry enough, paint the back of the roof area as well.
Fairy Houses Step 7
When dry enough, give the roof a second coat of Copper Kettle, front and back.
Fairy Houses Step 8
Use a tiny coin to assist with marking the top of the front door.
Fairy Houses Step 9
Use a normal pencil to draw a half-circle around the coin.
Fairy Houses Step 10
Then draw two vertical lines meeting up with the half-circle to create a door.
Fairy Houses Step 11
Using Jet Black paint and a fine brush, paint the door, keeping your edges very neat.
Fairy Houses Step 12
The door will probably need a second coat of paint when the first coat is dry.
Fairy Houses Step 13
Mark the tops of the windows with an ordinary pencil.
Fairy Houses Step 14
Mark the bottoms as well, keeping the lines horizontal. Then mark the vertical lines.
Fairy Houses Step 15
Using a fine brush, fill in the windows with Jet Black paint.
Fairy Houses Step 16
Give the windows a second coating of Jet Black paint.
Fairy Houses Step 17
Using an ordinary pencil, draw half-circles on either side of the door and also on the sides and back. Use a coin as a guide if your lines are not sure.
Fairy Houses Step 18
Using Pistachio Green paint, fill in the half circles, keeping your edges neat.
Fairy Houses Step 19
Carry on and do the sides and the back as well, once the front is dry.
Fairy Houses Step 20
With an ordinary pencil, draw more scallop shapes so that they intercept in the middle of the Pistachio Green half-circle. Draw them all around to the sides and back as well.
Fairy Houses Step 21
Using Olive Green paint, paint the bushes on top of the lighter green bushes where you have already marked with a pencil. The Olive Green paint has a slightly translucent quality with it's first coat so take care to paint a very thin layer so that the texture and the lighter green below become a feature. Don't use a second layer of Olive Green as this will flatten the effect.
Fairy Houses Step 22
Paint the sides and back as well, when the front is dry.
Fairy Houses Step 23
Using a very fine brush and Lily White paint, paint thin lines around the windows and a horizontal line as well, through the middle of the window..
Fairy Houses Step 24
Paint a vertical line through the window.
Fairy Houses Step 25
Using a dotting tool with a small ball, make small, evenly spaced dots all around the edge of the door.
Fairy Houses Step 26
Allow to dry as these dots can smudge while you're working.
Fairy Houses Step 27
To make a little white heart on the front door, use a bigger dotting tool and make two dots, side-by-side (touching).
Fairy Houses Step 28
Then with a very fine brush, pull the paint down from the outer edge of the dot, to a middle point between the two dots. Proctice this on scrap paper first if you're not sure.
Fairy Houses Step 29
Allow the heart to dry before continuing.
Fairy Houses Step 30
We're going to paint a tree on the left-hand side of the house (if it's easier for you to do it on the other side, that's fine). This is the reference for the tree - a main trunk, branching off into thinner branches and twigs.
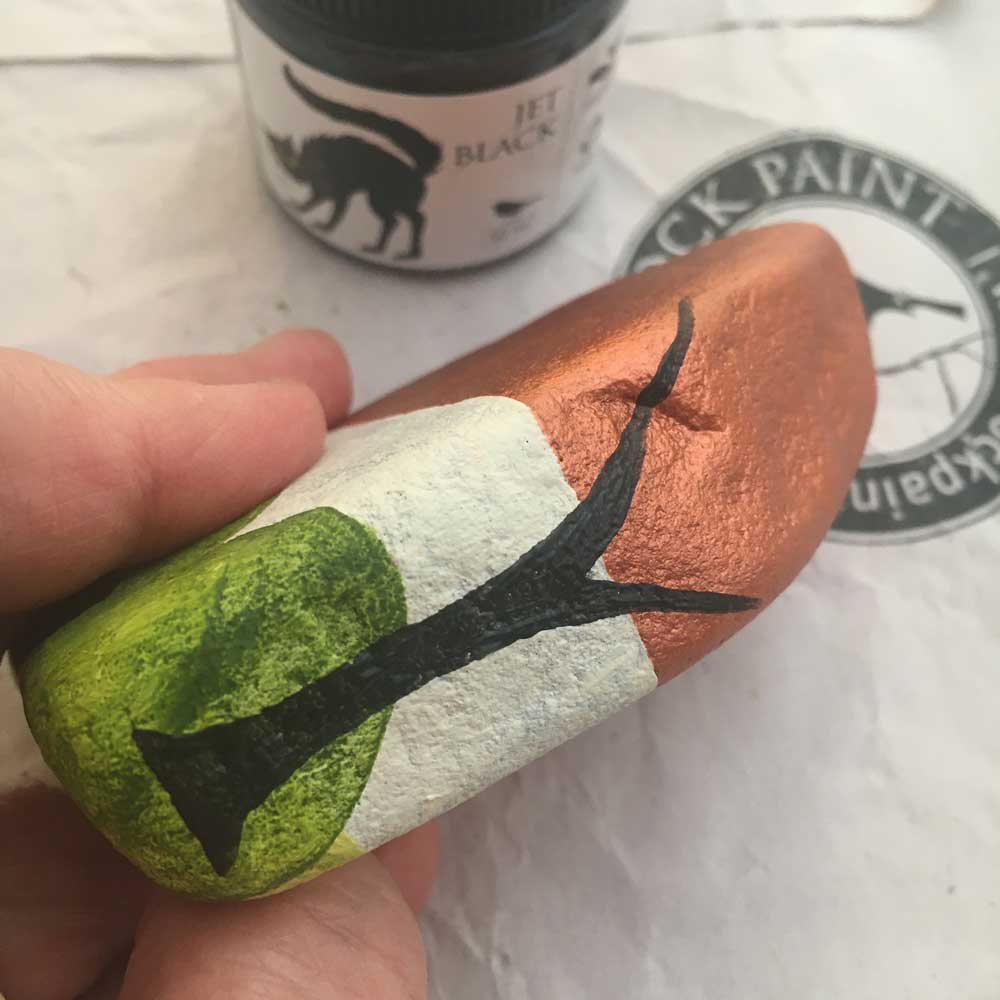
Fairy Houses Step 31
Using a medium-round brush and Jet Black paint, start with the base and trunk of the tree which is the thickest part.
Fairy Houses Step 32
Paint the trunk almost up to the roof.
Fairy Houses Step 33
Branch off into two directions, these branches will be half the width of the trunk.
Fairy Houses Step 34
Paint a third branch going straight up towards the top of the roof.
Fairy Houses Step 35
Give this branch a second branch, same thickness.
Fairy Houses Step 36
Extend the lower branch onto the front of the roof.
Fairy Houses Step 37
Add more branches which are half the thickness of the three or four main branches.
Fairy Houses Step 38
Keep on adding more and more thinner branches, all flowing in a similar direction, they can overlap each other.
Fairy Houses Step 39
Do the same on the sides and back of the fairy house when the front is dry.
Fairy Houses Step 40
When all the branches are nice and dry, use a medium sized dotting tool to all tiny white dots - these are spring blossoms.
Fairy Houses Step 41
For Cherry Blossoms, you can make half of the dots white and the other half Piggy Pink paint.
Fairy Houses Step 42
Once all your blossoms are dry, use the dotting tool again and dot Pistachio Green paint dots on top of the Olive Green bushes.
Fairy Houses Step 43
Then add Olive Green dots over the lighter green bushes as well as some extra dots on the Olive Green bushes.
Fairy Houses complete
Your Fairy House is complete, if you know of a place with fairies, you can leave the house there for them.
Products used in this tutorial
-

Jet Black 50ml
R44.00 Add to cart -

Olive Green
R44.00 Add to cart -

Copper Kettle
R60.00 Add to cart -

Pistachio Green
R44.00 Add to cart -

River Stone
R44.00 Add to cart -

Starter brush set
R196.00 Add to cart -

White Pencils (each)
R31.00 Add to cart -

Varnish
R70.00 Add to cart -

Piggy Pink
R44.00 Add to cart -

Double-Sided Dotting Tool Set of 5
R70.00 Add to cart


